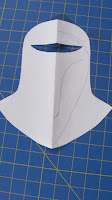
Since I finished my Star Wars dress, it was time to work on accessories. I think accessories are my favorite part of most outfits! I really wanted to cover a range of bad guys in my outfit and my favorite Star Wars costume of all time has always been the Imperial Guard, so I decided to make an Imperial Guard themed purse. The main body of the purse would be decorated with an appliqued Red Guard helmet, the pattern I drew is here.

Off I went to the fabric store to get red vinyl and purse bits. I picked up 1/2 a yard of the new vinyl from the Yaya Han collection at Joann Fabrics (more on this fabric later). I decided on a sew on frame for my purse. Once I got the frame home, I drafted up the rest of the purse to fit the frame. Since at least one of my friends has asked how to use this style of purse frame, I will discuss it a bit here. First I traced the frame onto paper, you can see in the photo how the frame fits the top edge of my paper pattern. I then designed the rest of the purse shape. I then cut out the fabric adding a seam allowance to each side, including the top edge. I tend to use a narrow seam allowance but this is not necessary, use whatever you are comfortable with.

Once I had my fabric cut, I cut the helmet shape out of the vinyl and cut out the eye slit. I then stitched the slit down to a black vinyl from my stash and cut away the excess black vinyl. Once this was done, I appliqued the helmet onto the my base black cotton. I have appliqued vinyl before, but never 4-way stretch vinyl. I usually do not pin the vinyl since it scars the vinyl and I also don't use a fusible interfacing since it is easy to scorch vinyl. Usually just holding the vinyl shape in place is fine. Not with this stuff, the vinyl caught on my presser foot and stretched out of shape! I had to re-cut the helmet and try again. This time I pined right on the very edge, basically where the seamline would go and turned my machine speed to the slowest possible stitch. I then had to release the presser foot every couple of stitches to prevent the vinyl from stretching. It probably would have been better to just go buy a different vinyl, but this stuff is more than $25 a yard so I did not want to spend anything more on this project! I then stitched the detail lines by sewing slowly and releasing the drag on the presser foot every few stitches. If you look closely, you can see scars from where I had to resew the details, this vinyl was just horrible to applique with. It might have helped to use one of the temporary bonding sprays to keep the vinyl in contact with the cotton, but I did not have any so I did not try this trick.

Next I added some red rhinestones I had laying around and stitched up the purse. I stitched up both the exterior fabric as well as the lining. I then added the lining to the exterior and completely finished all seams. The frame is then hand stitched to the finished purse edge. I have worked with nicer versions of this frame before and was able to use fine thread. This frame is a cheap one from Joann fabrics and the holes were a bit jagged, so I used button weight thread and doubled it to give it some strength and resist fraying.
The final thing was adding the purse strap. I intended to make the strap out of the vinyl, but it stretched too much and did strange things when I tried no matter what I did to control it. As an alternate, I bought a couple of Star Wars themed ribbons and layered them to make a strap.
 |
| Star Wars Ribbons |
The "Star Wars" ribbon is grossgrain and the Captain Phasma ribbon is satin. I stitched down the Captain Phasma ribbon onto a length of the Star Wars ribbon and then zigzag stitched a second piece of the Star Wars ribbon to the back of the first to make a double sided strap.
 |
| Finished strap (back and front) |
|
|
The only downside to using the ribbon is that I could not find metal strap pieces that were the right size, so I ended up using metal findings that were intended for creating adjustable straps. These worked fine but are a bit odd for just stitching straps to. I hand stitched strap holders to the back of the purse using some left over fabric. I then hand stitched the straps onto the holders. Here is the finished purse!


