Saturday, December 31, 2016

HSM December: Special Occasion

Birth of the Virgin 1365
Now that it is December, I regret how few of the Historical Sew Monthly Challenges I managed to do. They always help me push my boundaries and get something actually done!  This December challenge was no different.  Our local SCA Barony was having a Midwinter feast set in 14th century Italy.  I had originally planned to just wear something 16th century that I already had.  Then a friend challenged me to join him wearing 14th century and I remembered that I could use this for HSM December!  So this was a perfect fit! 

cutting the gown front with leaf detail
First I did some research and decided I loved the gown on the lady on the right in this image.  This image is a detail shot of a fresco by Giovanni da Milano in the Rinuccini Chapel in Santa Croce, Florence.  This fresco depicts the Life of the Virgin  and this detail is from the birth of the Virgin panel.  Giovanni da Milano was active from 1345-1369 and this fresco is dated 1365.  I absolutely love the leaf detail down the front of the gown!  However, I quickly decided I needed to use fabric I already owned as I already have a sizable stash.  So this eliminated a true copy as I have no white wool.  I did have some tropical weight blue/gray wool gabardine however, so I threw it in the washer and the dryer to felt it up a bit.  While the wool was washing and felting, I drafted a quick kirtle pattern and a quick leaf pattern.  I then cut the gown and sleeves from the wool and used the leaf pattern La Cotte Simple and was fairly happy with how they came out!  The then used the remaining silk for straight cut binding for the cuffs and collar of the gown.  I did this for 2 reasons, one there appears to be some binding at these points in the fresco and two, I have a skin reaction to wool so I wanted to bind the places that might touch around my underdress and shift.  The straight binding does not behave nicely on the neckline however, so I will need to fix this in the future!

hand sewing the wool to silk
silk bound buttonholes
Cutting the leaves was a bit tedious, but the effect was worth it!  I then searched the stash for a color of silk or wool that would contrast nicely with the blue/gray wool and found some cream colored silk satin left over from an old project.  There was not enough to cut the front panels in a single piece so I had to piece the front.  Due to the detail of the leaves, I had to hand sew the wool to the silk.  I was not sure if the leaves would have been sewn down or left free, so I decided to leave them free.  I also decided to add a front closure, as I am usually dressing myself! I used small round metal buttons and hand made buttonholes.  Hand done buttonholes make me really nervous, but I felt machine buttonholes would look terrible down the front of a dress like this.  Since I had never hand sewn buttonholes from this time period before, I used the tutorial from


For headwear, I wanted something more than what the lady in the fresco was wearing so I spent some time looking and some favorite blogs of mine for ideas. I decided I wanted a St. Brigitta's cap with embroidery and a D-shaped veil after looking a Katafalk. I am not going to post any in progress picks on these two since they basically followed tutorials from Katafalk, Cathrin has a wonderful guide toveil shapes and instructions for both a plain and a fancy St. Brigitta's cap.  I did simplify the insertion stitch since my thread turned out to be too thick for the fancy stitch Cathrin did. I also altered the band embroidery just because I felt like it.
St. Brigitta's cap
insertion stitch and embroidery

Here are some images of the full outfit and one event picture!  I really enjoyed this style and will likely make more in the future.  I also really want a frilled veil!


Monday, December 26, 2016

Alexia Maccon Cosplay Part V: The cape

Alexia wears this very cute little shoulder cape with her floating dress.  Looking at the cover, it appears to have a fancy closure at the neck, either applique or embroidery down the front, some sort of fluffy trim around the bottom and a standing collar.  The cape is also a fairly dark shade of blue.  Searching many fabric stores I could not find any silk that matched this color, so I settled on a blue poly satin. 

The pattern for this is basically a full circle with a neck hole and a simple standing collar.  I cut a slit into the circle to form the opening and then rounded the bottom front edges the give a more gentle curve.  If you look at the image to the left you can see the gentle curve to the bottom front.  The trim is a gathered lace with pleated satin over it.  Thankfully this trim was bought this way and did not need to gather the lace or pleat the satin!
 The design on Alexia's cape looked almost like velvet to me, but I was dreading doing the velvet applique and running out of time!  So I used heat set flocking material.  The idea for this did not come from me, but rather from a blogger I love, Fresh Frippery and her Lady Tremaine dress. She used this same flocking to add the lovely accents to her Lady Temaine gown (seriously this gown is amazing)! She used a Silhouette machine to cut out her appliques, I don't own one of these but found this stuff just as easy to work with without the machine.  I designed the appliques then drew them onto the plastic backing of the flocking material.  The designs were then cut out and the backing material removed by hand.  The designs were then ironed on (using a cloth to cover the designs).  Once attached the front covering was removed and I was left velvet like appliques!  The only down side I have found is that the flocking picks up sooo much cat hair and fuzz!  I am forever cleaning them up!


The closure is a false closure made of a fancy button bought at the fabric store and stitched to a straight piece of the satin (lined and interlined for strength).  The cape actually closes with hidden hook and eyes.


 I also added and applique to the back, I dont see one in the reference images but I wanted to add something here.  You can also see that the satin stretched and I added 2 small pleats to the back to allow it to fit the collar.  The collar is a simple standing collar, cut to fit my neck measurement.


Here is the front of the finished cape, forgive my messing sewing room backdrop!  The only thing I have left for this costume is the parasol.  While I did get the parasol to usable before the event, there are still some details I would like to add to really make it match the cover.  I hope to finish this up shortly and will post about it when I do!

Sunday, December 25, 2016

Alexia Maccon cosplay Part IV: The bodice

Sorry about the really long gap between the bodice and skirt postings, I swear I did not forget, I just got really busy!


Looking at the cover image, the bodice has embroidery on the front panel, and black detail between the front panel and the side front panels.  In the case of the cover image, there is embroidery both at the top and the bottom of the front panel (not always true inside the book).  The sleeves are split open, with lace showing from underneath and with black bows facing up the arm and away from the cuff.

Looking at various black and white images in the book itself,  the bodice is often shown with the side front matching the odd drapes on the skirt and different from the front panel.  Since I was low on the blue silk from the skirts, I decided to use the silk Dupioni for the main parts of the bodice (sleeves, bodice back and sides) and the remainder of the blue smooth silk for the bodice front. 


Truly Victorian TV 462
I then had to decide what pattern to use for the bodice.  Looking at the length of the bodice and basic lines, I decided to alter one of my favorite Truly Victorian patterns, the tail bodice pattern.  I love the way the back looks in this pattern and felt it would compliment the skirt well.  I was also very easy, due to the dart placement, to make the bodice front into a separate piece.  I did decide to remove the collar entirely, due to the presence of the cape.  I did a quick mock up and made the pattern alterations and was ready to go.  The sleeves I made much tighter. I usually have to tighten the sleeves on Truly Victorian patterns anyway, but I wanted these to be so tight that the sleeve would want to open up at that split and show the lace underneath.


I then very carefully, and with much squinting at the front cover, designed embroidery that I felt replicated the pattern on the front of Alexia's bodice close enough.  Here is the embroidery I decided on.  I then flat-lined the silk as it was so thin, I was worried it would not lay flat for the embroidery. Once flat lined, I embroidered the front of the bodice with black silk floss.

The images below show the embroidery detail on the finished bodice.  


Bodice top embroidery detail

Bodice bottom embroidery detail


I was now ready to put the bodice together, other than adding the front panel, with black silk piping and altering the sleeves, I followed the instructions from the Truly Victorian Pattern.  The sleeves were lined in blue cotton and the bottom 6 inches (until just above the slit) was lined in more blue dupioni. A false cuff of lace was then added to the inside of the sleeve.  The white lace was gathered onto a cotton false cuff.  Only the bottom row of lace goes all the way around the false cuff, the rest of the lace is gathered only into the area that would be shown by the slit.  Here is a close up of the sleeve to give you and idea of the lace placement. 

sleeve cuff close up
sleeve from the back


Finally, here are some images of the finished bodice!  Sorry for the slightly wonky photos, the bodice does not fit on the larger dress dummy at the bust (no squish......) and it hangs on my smaller dummy.  Oh, and I learned something I truly detest doing, self fabric covered buttons!  The buttons are all covered in the thin silk fabric.  This fabric shredded easily and made making self covered buttons a true pain, however I think the look nice and am glad a persevered and finished them.  Thank you all for reading and let me know if you have any questions! 
bodice back
bodice side
bodice front

Monday, October 24, 2016

Alexia Maccon cosplay Part III: The skirt


In the Manga, Alexia Maccon typically wears Victorian style outfits and, although some Lolita style bits have been added, the overall style is Victorian with a bustle. Thankfully, I already have a bustle and a corset that I had made previously, so I just needed to focus on the skirts and bodice.  The skirts appear to have either 2 layers or a ruffled white petticoat that is slightly longer than the skirt.  The overskirt is teal with black strapping around the front and teal and black ruffles down the back.  There are little hip poufs edged in lace either on the skirt or on the bodice.  The skirt also appears to be roughly walking length rather than trained, which is amazingly nice for wearing at Conventions! 
I decided to make a 2 layer skirt, with the petticoat layer in white cotton and the overskirt in teal silk. Making these things one skirt reduced the number of waistbands I needed to wear and since the petticoat is longer than the skirt, I would never wear this petticoat with any other Victorian since usually I dont have my petticoats showing!
 
Now I had to pick a pattern and here I had a conundrum.  The 
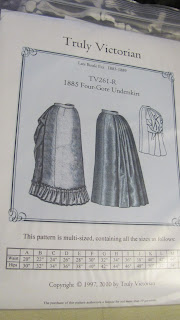
Parasol Protectorate is set in the 1870s, but the bodice length and style on the Manga cover appears more 1880s to me.  I decided to go 1880s for this outfit, since I felt it fit the image on the cover more even though author sets the books in the 1870s.  I based my underskirt/petticoat layer on the Truly Victorian TV261-R.  Since this simple base would be easily altered to fit the image on the cover and still full enough in the back to give that satisfying bustle skirt swish!


I used to completely plain view (no ruffle and no bustling) and made it out of white cotton.  I then added 2 layers of really narrow ruffles.  To keep the ruffles simple, cut the ruffles from the selvage of the cotton so there are no seams and no hems!  I used the pattern with no alterations for this layer, including all the darts to make this layer smooth over the waist of the corset.


Once the white underskirt was done, I needed to make the overskirt.  I again used the plain TV261-R pattern, but with a bunch of alterations.  The back panel is cut exactly like the pattern.  Ruffles for the back were made with 3 times the width of the back panel, hemmed both top and bottom and then gathered onto the back piece before assembling the skirt.  The ruffles start a few inches down from the top, since I knew the top of the skirt would be covered by the bodice. The ruffles are are the same size, except for the bottom most one which is the same width in the center, but tapered to the sides as the center back of the skirt is longer to accommodate the bustle.
It was in the middle of cutting the skirt ruffles that I realized I had a problem.  I had bought 2 yards more silk than I though I needed, but had not realized how narrow the thai silk is!  I ran out of silk before I cut the main parts of the bodice or the side poufs!  I ordered more silk from my Bangkok Silks, but found that there is a lot of batch to batch variability in the color and I could not use any of the other silk that came in for this project! This silk was wonderful to work with, but in the future I will order way more than I need so I dont have this problem again!  I really did not want to have any of the ruffles a different color, so the bottom ruffle is really heavily pieced but I did manage to get the full skirt out of the teal silk.

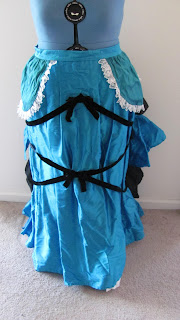
The side panels and the front panels greatly expanded versions of the panel pieces from the TV261-R.  Since the image shows the skirt being strapped down and falling in gentle pleats down the front, the base pattern would not work.  This pattern is designed to give a very smooth look and so would be insufficient for the puffiness under the strapping.  Basically, I split both the side and front pattern pieces from top to bottom and widened the pattern pieces as much as a could while not piecing the panels (since piecing would be really obvious in the main skirt panels).  I then pleated the skirt rather than darting the skirt.  To keep the pleats flat under the bodice, I stitched down the top several inches of each pleat. You can see the sewn pleats to the left.


I decided I wanted to attach the odd lace edged hip poufs to the skirt, but I had a problem, I knew I was going to have to use a different fabric for the hip poufs  (and the main part of the bodice) but I was having no luck getting really closely matching Thai silk.  In scanning through the manga I noticed that Alexia was often drawn with the hip poufs and the main bodice a different shade (see the image to the left). However the front cover shows the same, or very close color.  I decided to go for a very close color but a totally different texture in silk.  I picked a very close color match dupioni but of course the dupioni has slubs and the Thai silk is much more smooth.  The hip poufs were drape drafted using scrap fabric until I liked the shape.  I then cut them out of the dupioni, gathered lace to the edge and lined them in the cotton.  At this point I attached the waist band, sewed the openings of the underskirt to the over skirt and added hook closures.


I then put the skirt on with the bustle and marked where the bodice would likely hit.  At this point I put the bustle and the skirt on a dress
dummy and played with the velvet ribbon to make the strapping until I was happy with it.  The crossovers and the strap ends are covered with small bows of the same velvet ribbon.

Overall I really love this skirt, it is so swishy and big!  


Sunday, October 23, 2016

Alexia Maccon Cosplay Part II: The Hat

Close examination of the cover art and images on the inside of the manga shows that for floating, Alexia wears a teal top hat with ear covers that are embroidered and edged in lace and with a short veil hanging down the back. The teal of the top hat matches her sleeves and main dress fabric pretty exactly, so I decided that using the same fabric for both would be a good idea.  The main fabric I purchased for the dress was Thai silk from Bangkok silk and while this silk is absolutely gorgeous and wonderful to work with, it is very thin.  So I decided the hat should be made of 2 layers of millinery buckram, wired and mulled in flannel. 


I also decided that the embroidered ear covers should be interlined in cotton to help hold the shape and hand embroidered in black silk.  Now I needed to pick the embroidery pattern, as with almost every drawn character I know, there is variability between frames as to exactly what the embroidery looks like.  I used the image to the left to design the embroidery. I first drew the embroidery onto paper and then used a light box and a pen to transfer the image the thin silk.  In this case the thin silk worked to my advantage as I could trace the pattern directly onto the silk using the light box. My interpretation of the embroidery is visible to the left.  I flat lined the silk with cotton and then embroidered the design in silk twist thread.  I felt the silk needed to be flat lined before embroidery as it was so thin.  These ear covers were then lined in silk and edged in gather lace.  They were then set aside until the hat was finished.


I apologize in advance for the lack on photos, I was so worried about getting this costume done that I did not take enough photos during the process.  However, I will share what I can, and I am happy to answer any questions people have.


 The hat was made using a pretty standard top hat pattern I had previously drafted.  Basically, I have an oval that is fitted to the crown of my head (not designed to sit down very far onto the head) for the brim.  The top of the hat is a circle rather than an oval simply because I like the shape more for the top of my hats and it seemed Alexia's hat was also likely a circle at the top.  The circle has the same circumference as the oval.  The hat side is a single straight piece that is slightly longer than the circumference of the circle to allow overlap at the back.  The brim and the oval were wired with millinery wire by zigzag stitching the wire to the edge of the buckram. To support the buckram, both the inside and the outside edge of the brim was wired.  The side piece the seam allowance clipped and then hat was hand stitched together.  The image to the left shows the stitching and seam allowances on the inside of the hat.  Once The buckram was stitched together, I mulled the hat with some scrap blue flannel, the flannel mulling is simply used to smooth out the shape and disguise the wire.  The silk was so thin, I was worried the wire would show. The flannel was cut using the same pattern as the buckram for the brim and the sides, but the crown had a seam allowance added.  I cut 2 copies of the brim, one for the bottom and one for the top of the brim to smooth both sides.  I then stitched bias tape around the outside edge of the brim to further smooth the edge. 
At this point, the silk cover was prepared.  For the brim and the crown, a seam allowance was added as there was none present on the buckram. First the brim pieces (one for the top and one for the bottom) were machine stitched together along the outside edge.  The seam allowance was clipped and the brim fit to hat and hand-stitched into place. Care was taken to hide the seam allowance on the brim either inside the hat or up the side of the hat on the outside. The crown  also had seam allowance added.  The crown was machine stitched to the hat side piece, seam allowances were clipped and then fit to the buckram form.  The seam allowance for the side was tucked under and then the stitched to the buckram form.  This means that the side neatly covers the seam allowance from the brim. 
At this point, the ear covers were stitched to the inside of the hat.  On the inside of the hat, to prevent the hat slipping down, a strip of cotton the same length as the circumference of the inner brim stitched to the inside of the hat.  The upper edge of this strip has a channel sewn into it and a draw string.  This allows the inner lining to be gather and keeps the hat from being able to slip down on your head. Since the images of Alexia also show lace at the front of the hat, but under the brim, I gathered some lace into a piece of bias tape and hand stitched it to the inside of the brim.

Last was the addition of the decorative band and the black veiling. The seam between the side and the brim is then covered by the velvet ribbon and the black veiling was simply a very long rectangle gathered to the back of the hat. Since the veiling is a tulle like material, I did not need to edge any of it.  I added a velvet bow to hide the gathering stitches on the veiling and add a small detail.  I then stitched really long ribbons the ends of the ear covers to allow the hat to be tied to my head.
Here are some images of the finished hat, I am pretty happy with how this hat came out!


Monday, October 17, 2016

Alexia Maccon Cosplay Part 1: wig and goggles

As I mentioned in my Gaslight Gathering post, I made a replica of the floating dress Alexia Maccon wears on the front cover of the second Soulless manga.  I absolutely LOVE this outfit!  One of the first pieces I worked on was the goggles and dealing with the fact that my hair is most definitely not black!

For the hair I decided to purchase a black wig.  I went back and forth many times about the length the wig I should purchase and the style of the bangs.  The reason for this is that the hair length and the style seems to vary greatly in the manga, sometimes it appears to be only shoulder blade length and sometimes waist length!  Alexia's hair is almost always curly and often has shorter tendrils near her face and usually bangs. After much squinting at this cover, I decided I wanted a curly wig, with bangs and shaped sides near the face to allow me to have some curly tendrils near my face.  Problem number 2 is that I have a reasonably big head normally and waist length hair that makes for a really big head when I wear my hair in a bun to hide it under a wig!  Most cosplay wigs simply do not fit my big head with my real hair up under them.  After much wandering around on various cosplay sites for wig advice, I decided on the Hestia wig from Epic Cosplay.  Their wigs fit larger heads better and was actually pretty comfortable!  I was able to wear this wig all day and it did not slip or give me a massive headache. 

The goggles Alexia is wearing match her dress (of course) which meant I needed teal/turquoise googles which had metallic gold rims.  As this is not a color you can purchase goggles, I decided to paint them.  I purchased really cheap goggles on Amazon.  These things are listed as welding goggles on Amazon, although I think they are much better for cosplay than actual welding.  I liked them because they had the rubber edge for comfort and they screw apart to allow the addition of other lenses and make painting them much easier.  My husband and I purchased teal and gold spray paints from the local home improvement store to paint the goggles.  This paint specifies that it can be used on metal without priming, to allow a nice thin paint layer.  We disassembled the goggles and painting the screw part gold.  He covered the rubber and the leather nose piece with painter's tape and then painted the base teal.  And here are the finished goggles, I think this was probably the easiest piece of the whole costume!  Next time I will talk about the making of the hat.


Sunday, October 16, 2016

Gaslight Gathering 2016 con report

Gail Carriger and myself as Alexia Maccon
Last weekend I was lucky enough to attend the Gaslight Gathering, a steampunk convention in San Diego.  I have been to a number of steampunk conventions and this is definitely one of my all time favorites.  The people were wonderfully friendly, the location was beautiful and eclectic, the panelists were entertaining and there were so many make and take workshops that the event was never dull! 

We decided to go because Gail Carriger was the guest of honor! She has long been a favorite author of mine and I was super excited to meet her and to hear her speak about her books and ideas. In honor of her, I made a gown based on the cover of the manga from the Souless Series (I will post more on the making of this dress in future posts). I wore the dress on the first day and got to take my picture with Gail! She is an absolute delight and one of my favorite con guests ever.  Gail took pictures with fans, talked with all of us, was charming at her book signings, attended much of the convention, spoke with anyone who wished to speak with her and was elegant on top of all of this!  She even posted pictures she took with those of us who dressed as characters from her book on her blog.  Gail is amazing as an author and an utter delight as a person!
SPLASH

SPLASH
SPLASH
Besides the perk of Gail Carriger's presence, the con itself was absolutely amazing.  There were ~30 make and take workshops, some of which were free and all of which seemed amazing.  My husband and I took 3 workshops: Build Your Own 7ft. Wide Retractable Wings!, Copper Charms workshop (with copper clay) and Learn To Solder: Lightup Bug Workshop.  I will grab pictures of these things as we unpack and post pictures of these as well.  The workshops were delightful and I wished we had found time to take more of them. There were also many con panels that were great fun.  Some favorites were Gothic Literature and Its Influence on Steampunk and the Short Steampunk Film Festival.  There was live entertainment, including SPLASH II! Water Ballet Encore, an all male steampunk water ballet by the Steam Punk League for Aquatic Shenanigans (S.P.L.A.S.H.).  There was also a Tea with theatrics in which we flew around San Diego in a dirigible and got lost in time with the crew of the Lupita and a lovely ball with both live music and a DJ.  A whole room full of steampunks did the Time Warp! And of course a wonderful vendor room full of fun things to buy. There was also teapot racing and 2 fashion shows.  If you wanted something more relaxing, the con showed movies in the evening.

SPLASH
My husband and I purchased the VIP tickets and I can say they were well worth it!  There was a nice selection of cool things in the gift bag including art by Brian Kesinger, a lovely t-shirt and light up icecubes for later prop making.  The VIP lounge was well stocked with good snacks and stuff to drink and staffed by very nice people.  It was also a very cool room for those of us whose costumes were hot!   VIPs also got early access to workshop sign ups, which was a very nice perk. 

SPLASH
In addition to all this wonderfulness there were many many people in amazing costume.  I took some pictures, but in searching on the web I found so many amazing costumes I missed!  This whole event was a delight and I really hope we are able to attend again!


Here are some more photos from the con.  First some photos of what my husband wore.  He kept things simple on Friday and Sunday with a vest, hat and cane.  On Saturday he wore the Poison Doctor outfit with his new poison finder prop.


 I wore the Alexia Maccon dress on Friday.

The Alexia dress is great fun to wear, but it is a bit limiting!  I tried to take a picture sitting in the replica time machine and the skirts barely fit!  The time machine was amazing however, the lights work, the dish spins and it is all controlled by the dashboard.

And 2 outfits on Saturday, although I only got photos of one.  I wore the Anime inspired outfit in the morning due to needing my fingers free for the Copper Clay workshop and the Dia de Muertos outfit in the afternoon.  On Sunday I wore my vampire gown.


 Here are some photos of some of the other lovely and amazing costumes and props we saw at the con, but as I mentioned before there was so much amazing things to do and people that this is just a small amount of the cool things we saw there!  A note to the subjects of these photos, if you see yourself and would like the photo removed, just let me know and I will remove it! Also, if you would like a link to your own blog here let me know and I will add it!