Sorry about the really long gap between the bodice and skirt postings, I swear I did not forget, I just got really busy!

Looking at the cover image, the bodice has embroidery on the front panel, and black detail between the front panel and the side front panels. In the case of the cover image, there is embroidery both at the top and the bottom of the front panel (not always true inside the book). The sleeves are split open, with lace showing from underneath and with black bows facing up the arm and away from the cuff.
Looking at various black and white images in the book itself, the bodice is often shown with the side front matching the odd drapes on the skirt and different from the front panel. Since I was low on the blue silk from the skirts, I decided to use the silk Dupioni for the main parts of the bodice (sleeves, bodice back and sides) and the remainder of the blue smooth silk for the bodice front.
 |
|
|
|
|
|
|
|
|
|
|
|
|
|
|
|
|
|
|
|
|
|
|
|
|
|
|
|
|
|
|
|
|
|
|
|
|
|
|
|
|
|
|
|
|
|
|
|
|
|
|
|
|
| Truly Victorian TV 462 |
I then had to decide what pattern to use for the bodice. Looking at the length of the bodice and basic lines, I decided to alter one of my favorite Truly Victorian patterns, the tail bodice pattern. I love the way the back looks in this pattern and felt it would compliment the skirt well. I was also very easy, due to the dart placement, to make the bodice front into a separate piece. I did decide to remove the collar entirely, due to the presence of the cape. I did a quick mock up and made the pattern alterations and was ready to go. The sleeves I made much tighter. I usually have to tighten the sleeves on Truly Victorian patterns anyway, but I wanted these to be so tight that the sleeve would want to open up at that split and show the lace underneath.

I then very carefully, and with much squinting at the front cover, designed embroidery that I felt replicated the pattern on the front of Alexia's bodice close enough. Here is the embroidery I decided on. I then flat-lined the silk as it was so thin, I was worried it would not lay flat for the embroidery. Once flat lined, I embroidered the front of the bodice with black silk floss.
The images below show the embroidery detail on the finished bodice.
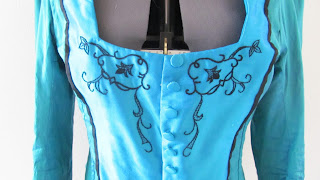 |
| Bodice top embroidery detail |
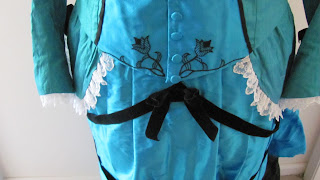 |
| Bodice bottom embroidery detail |
I was now ready to put the bodice together, other than adding the front panel, with black silk piping and altering the sleeves, I followed the instructions from the Truly Victorian Pattern. The sleeves were lined in blue cotton and the bottom 6 inches (until just above the slit) was lined in more blue dupioni. A false cuff of lace was then added to the inside of the sleeve. The white lace was gathered onto a cotton false cuff. Only the bottom row of lace goes all the way around the false cuff, the rest of the lace is gathered only into the area that would be shown by the slit. Here is a close up of the sleeve to give you and idea of the lace placement.
 |
| sleeve cuff close up |
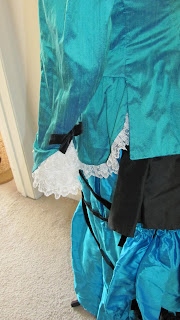 |
| sleeve from the back |
Finally, here are some images of the finished bodice! Sorry for the slightly wonky photos, the bodice does not fit on the larger dress dummy at the bust (no squish......) and it hangs on my smaller dummy. Oh, and I learned something I truly detest doing, self fabric covered buttons! The buttons are all covered in the thin silk fabric. This fabric shredded easily and made making self covered buttons a true pain, however I think the look nice and am glad a persevered and finished them. Thank you all for reading and let me know if you have any questions!
 |
| bodice back |
 |
| bodice side |
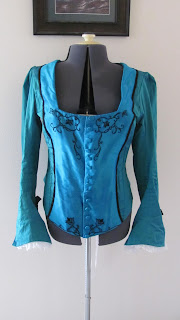 |
| bodice front |


