Monday, March 23, 2015

HSM for March: stashbusting a Regency hat

For the few of you asking what happened to the blue challenge in February, I am still working on it but the handwork is taking forever.....I do intend to finish the dress one day but February was unfortunately very optimistic for me.

The HSM challenge for the month March was Stashbusting.  Like almost every costumer I know, I have a ton of accumulated stuff.....bits of fabric that was perfect or cheap or maybe a bit of trim that was too much to throw away but too little for most projects.  Stashbusting is a good thing and something I need to do far more often as my stash is embarrassingly large.  In searching through my stuff I found a lovely piece of dupioni silk in forest green. This piece has been in my stash for years and is too small for anything other than a hat or a purse.  I have been in need of a new Regency hat so I decided on a quick Regency hat for my stash project.  Going through the rest of my stash, I found buckram, millinery wire, flannel, gold buttons, gold and green trim, a small piece of gold ribbon, green glass bead trim and forest green thread.  This project came entirely from my stash at hand.

 My inspirations for the shape were the Quickie Capote by Jen Thompson of Festive Attyre and the fashion plates webbed by Ginger from Scene in the Past on her flickr page.  However, I did make most of my hat up rather than copy any thing exactly simply based on personal preference.

Basically, I played around with paper until I got a brim shape and size I liked the look of. Once I had the size, I cut the brim out of 2 layers of millinery buckram and then machine stitched wire around the entire brim. 

The wire was stitched down using zig zag stitch and the edges of the wire were just overlapped by several inches as you can see in the photo.  The stitching of the wire was the only machine sewing I did on this hat.  I just really hate to stitch wire down by hand.


Since the wire would easily show through the thin silk, I added a flannel layer (called mulling) to give the silk a smooth line and hide the millinery wire.  The flannel is just hand stitched down with big stitches.  
 At this point I held the brim up to my head and measured the distance around the back of my head not covered by the brim.  For me this was 7 inches.  I needed this measurement to cut a small piece of the silk that could be used to bind the edge of the gathered back of the hat that would not be hidden by the brim.  I cut an 8 inch (1/2 inch added to each side for seam allowance) strip 2 inches wide to bind the back of the hat.

Hat back
The back of the hat is simply a huge circle gathered to fit the brim and the 8 inch strip of silk.  In my case, I have very long hair and often need to make extra room in my hats to accommodate my hair. If you are making your own hat a smaller circle may suffice.  Mine is 26 inches across. Since the silk is so thin, I flat lined it with some cotton muslin I had laying around to give it a bit of body.  The gathered circle was handstitched into the brim and the small strip of silk.  Then the brim lining was handstitched  down to hide the raw edges. 
Hat side
Hat front


The hat is decorated with some stash buttons and stash trim. All the decorations are handstitched onto the hat.  Although I needed lots of room for my hair, I felt the back of the hat could use some structure.  I took inspiration from Jen Thompson's Quickie Capote and gathered the very center of my big circle of fabric to make pleats.  I covered this gather with a button from my stash. 


The Challenge: Stashbusting

Fabric: green silk dupioni, white cotton muslin and cotton flannel
Pattern: none

Year: early 19th century Regency
Notions: thread, buttons, antique glass beaded trim, gold ribbon, gold and green braided trim, millinery buckram, millinery wire
How historically accurate is it? Maybe 70%? I made up the pattern and it is more likely historically inspired rather than historically accurate. Also, I am not sure if this grade of silk would have been used in the Regency period. 
Hours to complete: 15
First worn:  not yet
Total cost:  None, all of this was from my stash.
Stashed for how long? The trim and fabric have been stashed for at least 8 years.  The buttons are part of of a button stash passed onto me by my mother-in-law 16 years ago, so I have no idea how old they are!

Thursday, March 19, 2015

Steampunk Vented Top Hat

My husband's one complaint with Steampunk is how very hot everything is and since we live in the desert, I often have to find ways to make thing a bit cooler for him.  At a previous Wild Wild West Con, Susan Holt taught a wonderful class about adding vents into your Steampunk hat to make things a bit cooler.  Since we were returning to Wild Wild West Con and Tucson, I thought my husband could really use a vented hat!

If you are interested in making a vented hat, Susan Holt makes the leather gaskets and the mesh vents in really cool shapes and sells them.  Susan is happy to provide information on installing the gaskets and she has an album with the gasket shapes on her professional facebook page here.  Susan even has shapes like butterflies, gears and stars!  I highly recommend her gaskets, I saw them in person at the recent Wild Wild West Con 4, the gaskets are lovely and come with the matching screen. She also occasionally sells premade and wonderfully decorated vented hats on her etsy site here

The base for this hat is the John Bull Top Hat from Hats in the Belfry and is wool felt.  I talked to Susan Holt to tell her how wonderful her class was and how much I enjoyed making one of the hats and in this discussion she told me that the felt hats are much easier to work with than the cheap costume hats.  Secondly, the copper screen that Susan uses is much easier to work with than what I used.  I planned to use copper screen for my vents, but could not find any so I am using decorative aluminum punchwork stuff I found at the local hobby store. The aluminum stuff was a pain to drill holes for the rivets and I think the screen would have been easier.

First I played around with powerpoint and figured out the size for both my vent hole and my gasket.  Once the sizes were right, I then cut out both sizes in paper.  I decided on 2 vents, one on each side of the hat.  I cut 2 of the large size in leather and 2 in the aluminum.  I then centered and cut the smaller oval in the leather to make the gasket and provide an opening for the vent.  I used leather shears to cut the leather and tin snips for the aluminum.
Next, I cut a hole through the hat where the vents would be placed.  This whole is the smaller window size NOT the large size since I want to be able to rivet the gasket and the vent to the hat.  To cut the felt, I used an Xacto knife and carefully cut out this hole.

Next, I punched the rivet holes into my leather gasket using my leather punch.

I then, used this gasket to mark the drill holes in your vent material.  I then drilled holes in my aluminum vent to allow the vent to be riveted to the hat. 

I then took my gasket and lined it up with the vent hole in the hat.  I used a chalk marking pencil and marked the rivet holes in the hat.  I then used the same leather punch to punch matching rivet holes in the hat. 
In addition to vents, I planned to run PVC tubing with EL wire in it in and out through the hat.  I punched some large holes and set these holes with grommets to facilitate the tubing going from inside the hat to outside the hat.

Next, carefully rivet your vent and gasket to your hat.  This part sucks, it is really hard to set rivets in a hat, but I thought the effect was worth it.

Now repeat for all other vents!
For my specific hat, I was going to a 20,000 Leagues Under the Sea sort of theme, so I made some octopods out of polymer clay to add to the hat.  The blue clay has glitter in it and I hated working with it so much!  The blue clay was really brittle and did not want to work into any shape. The white clay is actually translucent and it was fine to work with.  I really don't know why the blue glitter clay was so awful to work with. 


I then added the EL wire and tubing as well as some brass pipe fittings to complete the look.  Here is the finished hat!  The power source for the EL wire and the extra EL wire are hidden in the top of the hat.
Hat front
Hat back


hat side 1
hat side 2

Tuesday, March 17, 2015

Wild Wild West Con 4 Part 2

Besides the fact that the venue for Wild Wild West Con is really cool and the concerts are wonderful (and held in the old saloon!), I love the make and take panels at this convention.  I went to a number of panels such as the Basics of Thermoplastics and Patent Medicines and Cures as well as demonstrations and panels by the League of STEAM in addition to all the make and take workshops.  I am a huge crafter/costumer and I love the Make and Take Panels.  I did 4 of them this year.  They do cost extra but are usually quite reasonable and usually result in a fun piece and a bunch of new knowledge for me.
 
The Tea Cup Headband Make and Take was with Dee Astell and involved making a real china mini teacup into a headband.  I was super excited for this project both because it was cool, but also I did not have any headwear for the second day of the convention.  I actually made this teacup headband on Friday.  The glue did not completely work during the Make and Take but I was able to fix it with my costume repair kit and wear a new piece on Saturday!  This workshop was a bunch of fun and everyone ended up with a completely unique piece.  There were very few repeats in the cups so for the most part the cups were unique.  Secondly, the ribbons and tulle were just put on a table and we were given free reign to design whatever we wanted.  Some ladies even covered their headband with ribbon or tulle, which is an idea I love and completely did not think of! Dee was available the whole time to help with any issues and everyone had a new piece to take home.

The remaining Make and Takes I took were all from the same teacher, Mike Syfritt.  In fact, he is the gentleman who is pictured below as the steampunk Joker.  He also has a webpage, MadPropps, and a etsy site by the same name.  All of the kits for the Make and Takes are also available on his Etsy site.  He was super helpful and the classes were so much fun.  

 The first Make and Take we took with Mike was the Leather Gas Mask.  The leather was all laser cut ahead of time and the plastic pieces were vacuum formed.  The pieces fit really well together and this kit went together very smoothly.  Mike showed us a glue I have never used before which made the assembly a breeze.  We did have time to rub and buff the plastic parts.  I did my central detail piece gold.  I have actually never used rub and buff before, so this as new to me.  I am waiting to rub and buff the canisters for later.  He also had both brown and black stain which were optional if we wanted to stain the leather.

The only complaint I had is that the organizers only allowed 1 hour for this class.  It was a huge stretch to get this done in 1 hour.  However, some people did complete it in one hour.  I did not.  I am somewhat glad I did not finish it.  The canisters shown to the left and right of the mask get added to the side.  Mike made the canisters 2 pieces so with a bit of work I can add LEDS to my gas mask and hide the batteries in the canisters.  I may also add some other detailing to make it more my own.  Overall this class was amazing!


The second class we took with Mike Syfritt was a foam mini top hat class.  I actually do make hats using traditional millinery skills and was completely intrigued by the idea of a craft foam hat. My husband and I both made the mini hats.  If we had preordered, Mike has full size hats as well.  The foam was all laser cut, the pieces were well designed and the hat glued together fairly quickly.  There was one issue where the brim did not quite fit right, but Mike helped all of us fix our hats and said he would update his pattern.  Now that the hat is completed, I just need to paint it or decide I really need a steampunk leprechaun outfit.....  I will say that these hats are remarkably resilient, I crushed mine in with the props to drive the 7 hours home and it popped right back into shape.  Mike said the only downside to these hats is they can be very very hot as they don't breath at all.  

 The final class we took with Mike was a goggle make and take workshop.  Again, the kit was very well designed and the goggles went together very quickly.  The leather was all laser cut and the pattern fit exactly.

Mike even had some really fun etched plexiglass lenses for purchase to help us customize our googles.  My husband used the plain ones, but I bought some blue Cthulhu ones from Mike for the class.

Mike even had a Cthulhu stamp to decorate the sides of my goggles!  The lenses are held in place with plastic braces, which I rub and buffed silver here.  Again we could have stained the leather either brown or black, but I decided to keep mine natural colored.  Since everyone could pick cool lenses, different stamps for the side, stain brown or black or leave natural and there were 3 colors of rub and buff the goggles all looked really unique.

All of these make and take classes were a blast and I got to try out so many cool new things.


Below are some pictures I took of the amazing costumes from the convention.  There are just too many to share and so many I missed taking a photo off.  Here at least are some of the images.  If any of these images are of you and you would like the picture removed let me know and I will take the picture down!  Also, if this is you and you would like credit for your work, give me a name or a link to a blog and I will post it!


I know this last picture includes myself, my husband and a friend, but I am cheating and including it here since I love the details on this very nice and talented dancer's outfit.

I love seeing all the amazing work these costumers did, there were so many amazing details and wonderful work. 


Monday, March 16, 2015

Wild Wild West Con 4 Part 1

This year I was lucky enough to attend Wild Wild West Con 4 (WWWC4).  This convention has long been a favorite of mine and I have been lucky enough to attend 3 of the 4 years.  The convention is held at Old Tucson Studios which is an old western movie studio and amusement park.  The setting is beautiful and makes for great pictures and Old Tucson has some cool things of its own that make for a unique experience.  I attended this year with the Albuquerque Steampunk Society, so there was a whole group of us together.

I am going to show some of the costumes we wore and a selection of really cool costumes I managed to get pictures of.  Really there were too many cool costumes to count!

The theme was Mad Science so my husband and I wore some of our good old standby costumes.  One of the first set of costumes I made for steampunk was a Radium doctor and a Mad Apothecary and I felt these fit the theme pretty well.
The Radium doctor costume is worn over a corset and petticoats followed by a brown cotton skirt with dark brown velvet detailing.  The white shirt is a horrible 1980s eyelet lace thing that I got cheaply at a thrift store and altered to make a quick blouse.  The apron is all leather and is riveted together.  The test tubes contain cake sugars.  The head mirror is actually an antique and I also carry an antique doctors bag, which was a gift from some friends.  One of my favorite parts of this costume is the radium detector (the funny looking wand and box in the pictures).  This prop was made by my husband specifically for this costume.  The wand is made out of copper tubing and brass pipe fittings. The detector is a large glass crystal set in cut and flared copper pipe. The detector has a set of blue LEDs wired into the copper pipe behind the crystal, which causes the whole crystal to glow blue when activated.  The box part was a cheap box purse from a craft store that my husband altered.  The box contains an old MP3 player and a small amplifier.  When the button on the lid is pressed the MP3 player either plays a Geiger counter noise of yells "Whoop Whoop Danger!" I have no idea which one will play as it is random.  At the convention, the only person the radium detector felt was dangerous is Nathaniel Johnstone!  I scanned him and the danger signal when off!  He is both an amazing musician and a super nice guy and I was very excited to get to meet him!  The Mad Apothecary is made of linen and has embroidered fraying patches I made using designs from Urban Threads.  My husband made the leather hat himself as well as the goggles we are both wearing.  He even made mine with blue glass!


The second day we went really easy and simple in our costumes.  I wore my super comfy outfit made especially for warm weather. The details of the construction are covered in my Steampunk mix and match post.  One my favorite things about this outfit is the voice stealing gun.  I actually got to use this gun on the performers that day! I stole sound from the League of STEAM during one of their performances and again at the Abney Park concert that evening. 

My husband wore a vest I made to match my corset, his teacup holster I made him and a new hat.  This hat has vents added to the side to make it cooler and EL wire to make it light up.  I will do a separate post on how I altered the hat.  He is also using his cane.  The cane has a large glass crystal and a whole set of multicolored LEDS so he can change the color and the pattern for the lights.


I even managed to remember to take some photos the second day and got some good ones of some of the people we traveled with.  These lovely ladies traveled each day from the hotel to the con with us. The lovely green fairy was made by Isabella Delphinia Ravensdale. On her tumblr she talks about the making of this costume.  She made some absolutely lovely accessories which none of my pictures due justice!


One of the reasons to go simple this day is that we were planning on an absinthe tasting and then be really silly afterward on some of the amusement rides.  The absinthe tasting was a blast and we even had our own Absinthe Fairy to keep us company.


 After partaking in the Absinthe treat, we decided to brave some of the local amusements.  I am sure many people were laughing at us as most of us were trying to ride the carousel horses side saddle!  Of course it did not help that most of us were laughing so hard that we were all having a hard time staying on the horses.

After the carousel, we decided to ride the little train that tours the park and hear more about Old Tucson Studios.  The train goes places that you cannot walk and the conductors give a bunch of background on what television shows and what movies utilized which buildings.  It was a fascinating tour.  Both of these activities were great fun and included for free with our con membership. 


Sunday was the big day for the Albuquerque Steampunk Society.  11 of us decided to join together and dress as Alice in Wonderland Characters.  First up we have Tweedle Dee and Tweedle Dum.  These costumes were made by Permelia Blackwell based off of the Disney Alice in Wonderland.  She discusses the making of these costumes as well as her other costumes on her blog.  I completely love her take on the Tweedles!


The rest of our car riding group consisted of the 8 of Diamonds, made by Isabella Delphinia Ravensdale. Myself as the Cheshire Cat and my husband as the Caterpillar.  I covered the making of both of these costumes earlier on this blog, so I wont cover any of it here. 


Later in the day we caught up with the other members of the group and took some pictures with a very old and cool steam train.  We had a White Rabbit, a Mad Hatter, a Red Queen, a White Queen, Alice and the Doormouse.

Here is Alice talking with the Doormouse, White Rabbit and the Caterpillar while the Mad Hatter looks for trouble.
The Red Queen and the White Queen were having a hard time keeping their parasols to themselves!

I have just noticed how long this post is getting, so I am going to save pictures of other people's costumes and the make and take workshops for Part 2.


Monday, March 9, 2015

Revamping the Steampunk Cheshire Cat and the diagonal seamed corset

Wild Wild West Con at Old Tuscon Studios was rapidly approaching and I was horribly sick with bronchitis.  I had planned on doing so many new costumes, but could barely muster the energy to do other mundane things that had to be done.  One costume that absolutely had to be finished was the revamp of the Steampunk Cheshire Cat.  I suppose I could have just worn it as it was the previous time, but the Albuquerque Steampunk Society was doing a group costume of Alice in Wonderland on the Sunday and I did not want to have my costume be a let down. As I felt a bit better I focused on this costume almost exclusively.

Some of the upgrades were simple.  First was the mask, the battery holders got moved to reduce the pressure point they created against my forehead and I added copper whiskers.  The whiskers are simple copper wire shaped and then super glued into holes drilled into the mask. I will admit the drilling made me really nervous, but the drill had no problem drilling the paper clay and made really neat holes.  I did not even have to fix the paint!

The second simple upgrade involved making a new belt.  Since I planned to move the tail attachment to the corset, I was going to need to destroy the belt that the tail was currently attached to due to the fact that the tail support was riveted to the belt.  I love the little cat face pouch I made and wanted to continue wearing it, so I made a really quick and dirty new belt.  This belt used scraps of the pink leather salvaged from the ruined belt and some brass colored rings.  The rings are for hanging curtains which I selected because they are the right size, but of unknown metal.  I just removed the clips that would hold the curtains and utilized the rings.  The spaced rings would allow me to clip on my little cat face pouch and also will allow me to make other bits to use in the future.  In particular I want a fan holster, they are so very useful at outdoor hot events. 

The hard upgrade was the corset.  I was determined to have a corset that had had stripes in pink and purple.  I also did not want simple vertical or horizontal stripes.  The solution came in the form of an article on Foundations Revealed which discussed a diagonal seamed corset.  The introductory article to these kinds of corsets is free and can be found here.  The advertisement is from 1885, so I figured I would see if I could use the 1883 corset patent I worked up for my HSM 2015 January challenge of foundations and turn it into a diagonal seamed corset.


To create the pattern, I made a simple mock up of the pattern I made in January and stuck it on my dress form.  I then drew diagonal lines were I thought they looked nice.  In hindsight, maybe evenly spacing the lines would have been good.  Maybe next time?


I realized that these pieces were going to be really confusing, so I number the pieces before cutting the mock up apart.
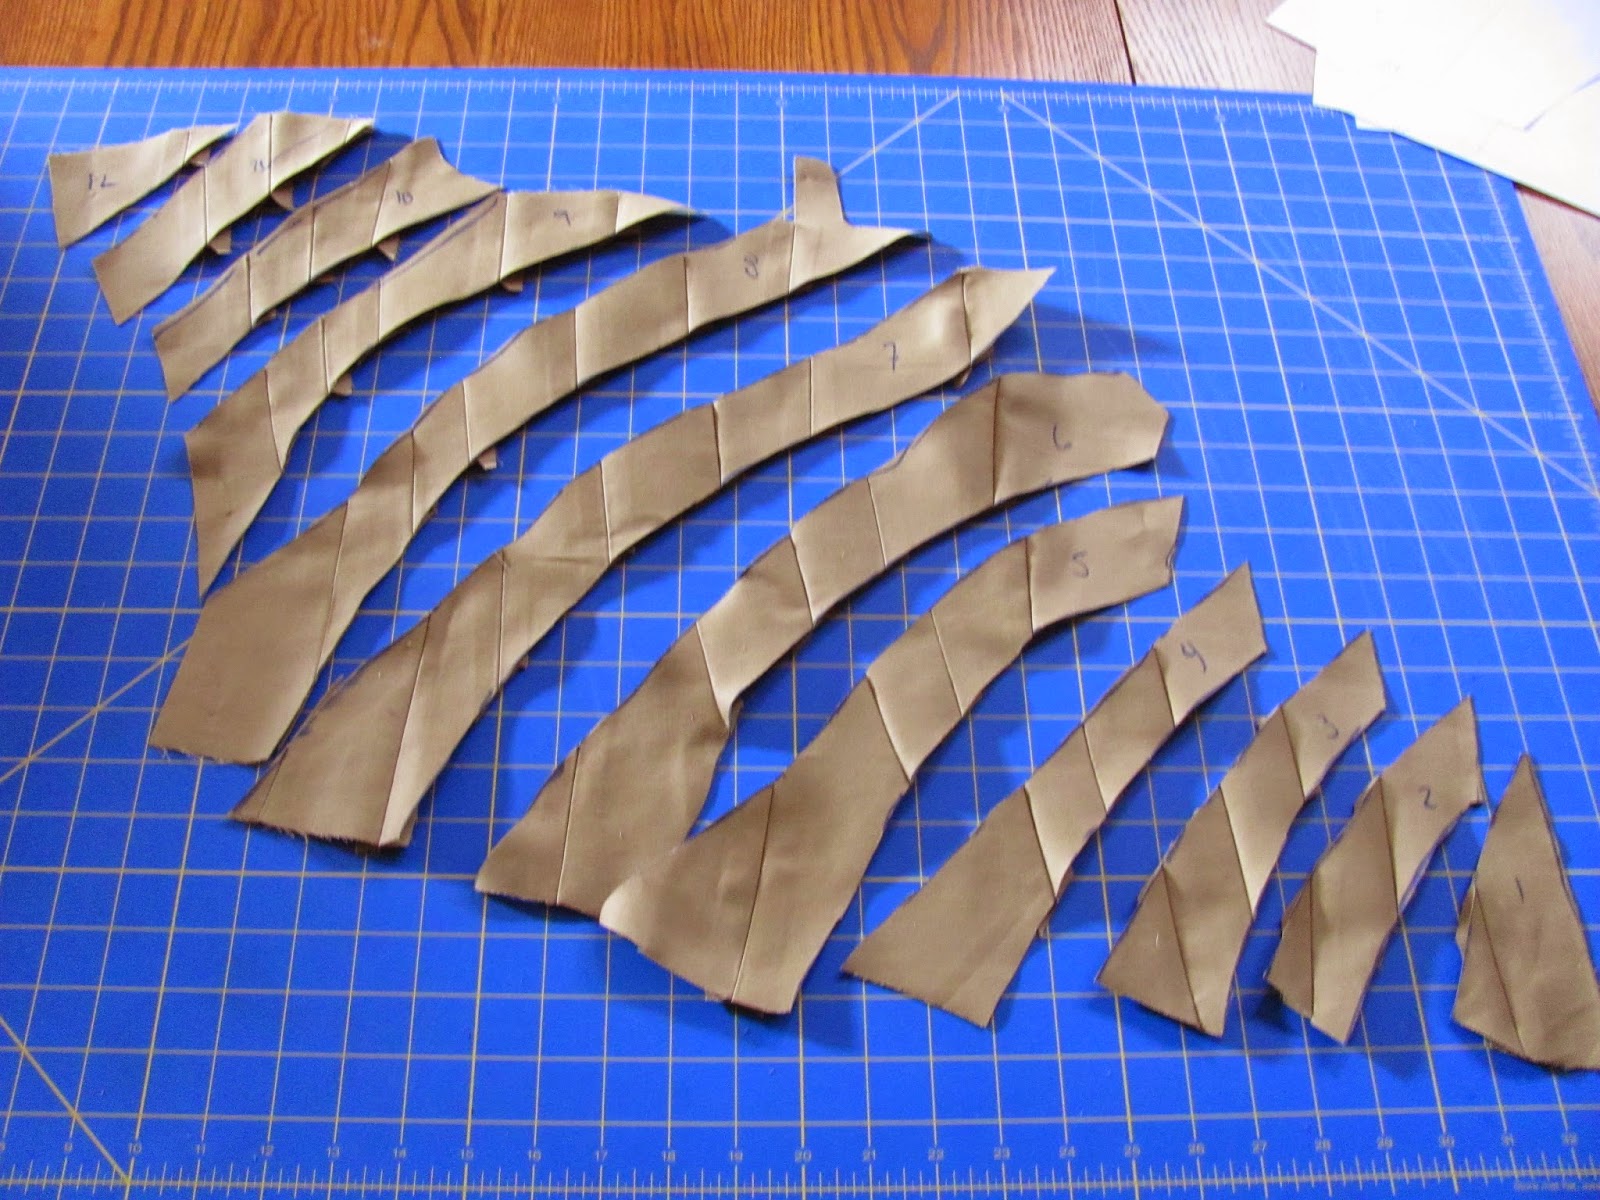


 I then cut this mock up apart to make a new pattern with the seams on the diagonal. 
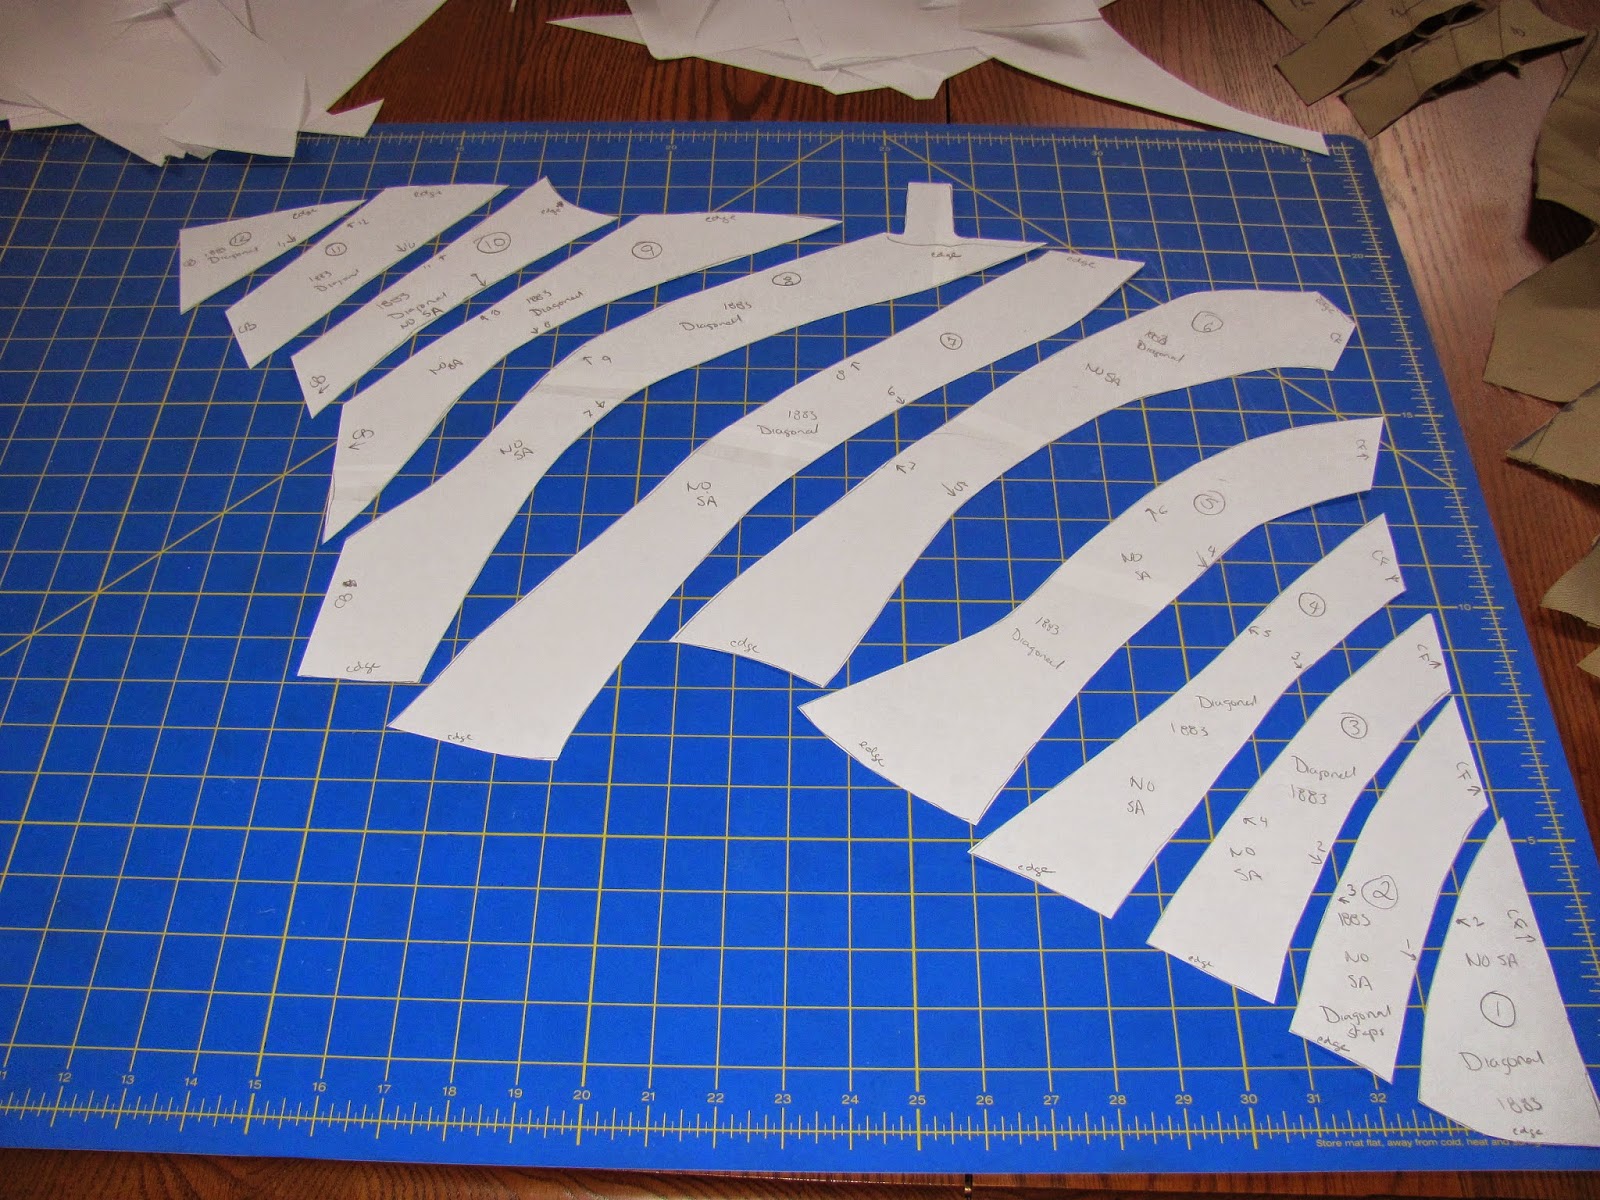


Since the fabric could bias and stretch a bit when pinning to cut the corset fabric, I carefully copied the pattern pieces to paper.  I also realized that I needed to mark absolutely everything on my paper pattern!  Normally I can be a bit sloppy in my marking, but I was worried that these pieces were so unintuitive that I would add seam allowance where I shouldn't and miss it in other places.  I marked the center front, back, where seam allowances needed to be added and where they did not.  I also marked what pieces and exactly where each pattern piece attached to.  I was pretty terrified of messing this corset up really badly while sewing.

At this point I made my first set of mistakes.  The only bright pink and purple fabric I could find that also had a nice shine to it was a cotton satin twill.  Unfortunately it had stretch to it, a 2 way stretch.  I have never used a stretch fabric before for a corset, but I figured I could make a strength layer with non-stretch twill and as long as I cut the diagonal pieces with the stretch only in the vertical direction it would all work out.  This idea would probably have been O.K. if I did not have problems with the strength layer later.
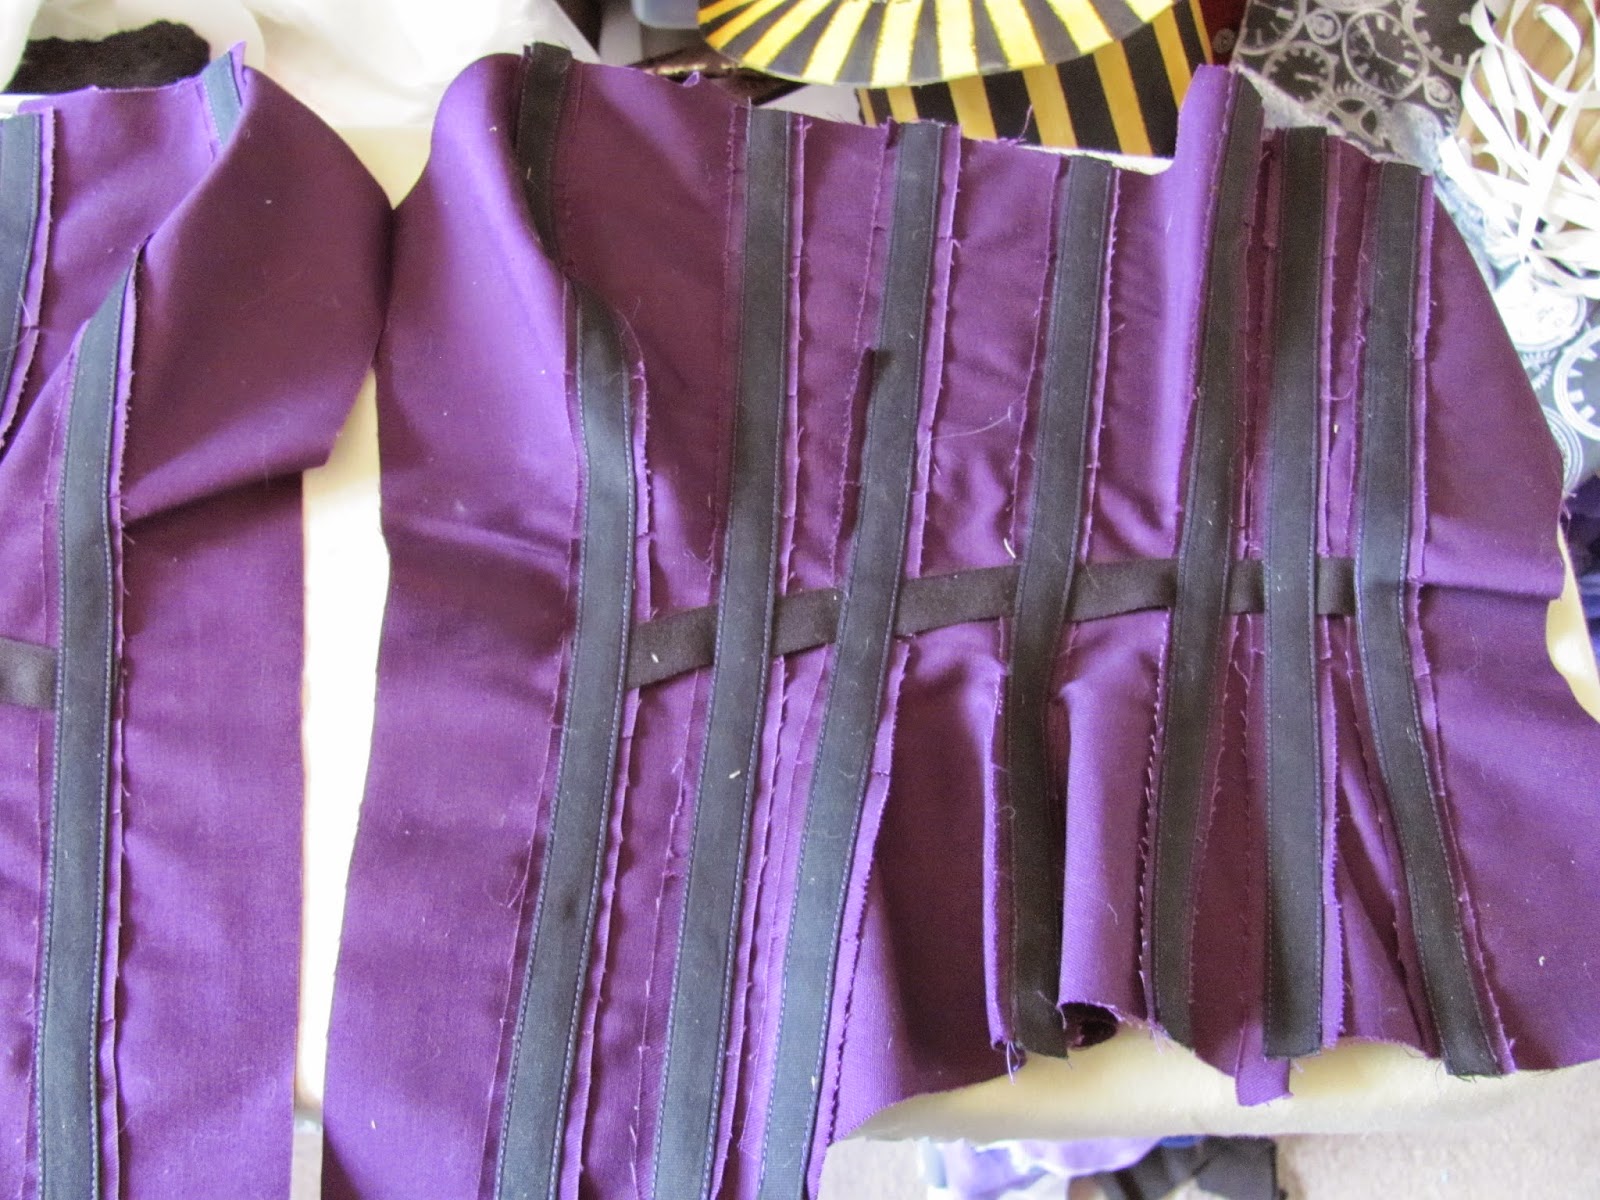
The next mistake is that I was a bit terrified of doing the diagonal pattern and still line up bone casings so I made the strength layer with normal vertical seams. The combination of vertical seams and the diagonal seams made lining up the strength layer and the fashion layer really challenging, but I decided to press ahead and added bone casings to the strength layer.  At this point I had a real problem!  It turns out that even though I bought bone casing in bulk and tested the casing with my boning, full size bones did not actually fit!  The boning fits very tightly and while it worked for short pieces of casing (3-4 inches) that I tested with, it would not work for the full length of the corset.  In fact, I got several pieces of boning completely stuck and since they were spring steel the stretched completely out of shape trying to free them!  The only thing I can think of is that the boning I am using is an old order from Weissner and maybe the bone casing I bought from Canada cannot fit the thick bones from Weissner.  I actually bought the widest casing available and my thick bones wont fit at all.  I will likely buy other boning so the casing is not a total loss, but this casing wont work with any of the boning I currently own.

In comparison to the strength layer, the diagonal layer went together like a dream.  I stitched together each piece, clipped and ironed each seam and then stitched down the seam allowance for each stripe.  I was really worried that having all those seam allowance run around would be really bad in the final corset.  After stitching down the seam allowance, I trimmed off the excess seam allowance.  Of course, now I had the problem of what to do since my strength layer was a complete failure.


I turned back to the Foundations Revealed article and found that the majority of surviving diagonal seamed corsets are one layer.  The bone channels are fabric or twill tape (I am not sure) stitched directly to the diagonal panels.  Since the fabric I selected does of stretch, this is not an ideal solution.  However, I decided to try it anyway since the stretch was all vertical and I hoped it would be O.K.  I used black twill tape to make boning channels and a waist tape.  This of course meant that the vertical stitching which would have been reserved for the strength layer will now be visible on all the panels.  Since I did not want the stitching to match only the pink or the purple, I used a variegated purple thread to stitch down all the channels.   I also added non-stretch twill as a strength layer just to the front closure to stabilize the busk and to the lacing panel.  I was very worried that any stretch around the grommets would mean failure of the corset while wearing it!  The entire corset is bound with bias tape and had the purple straps hand stitched to the inside of the corset.

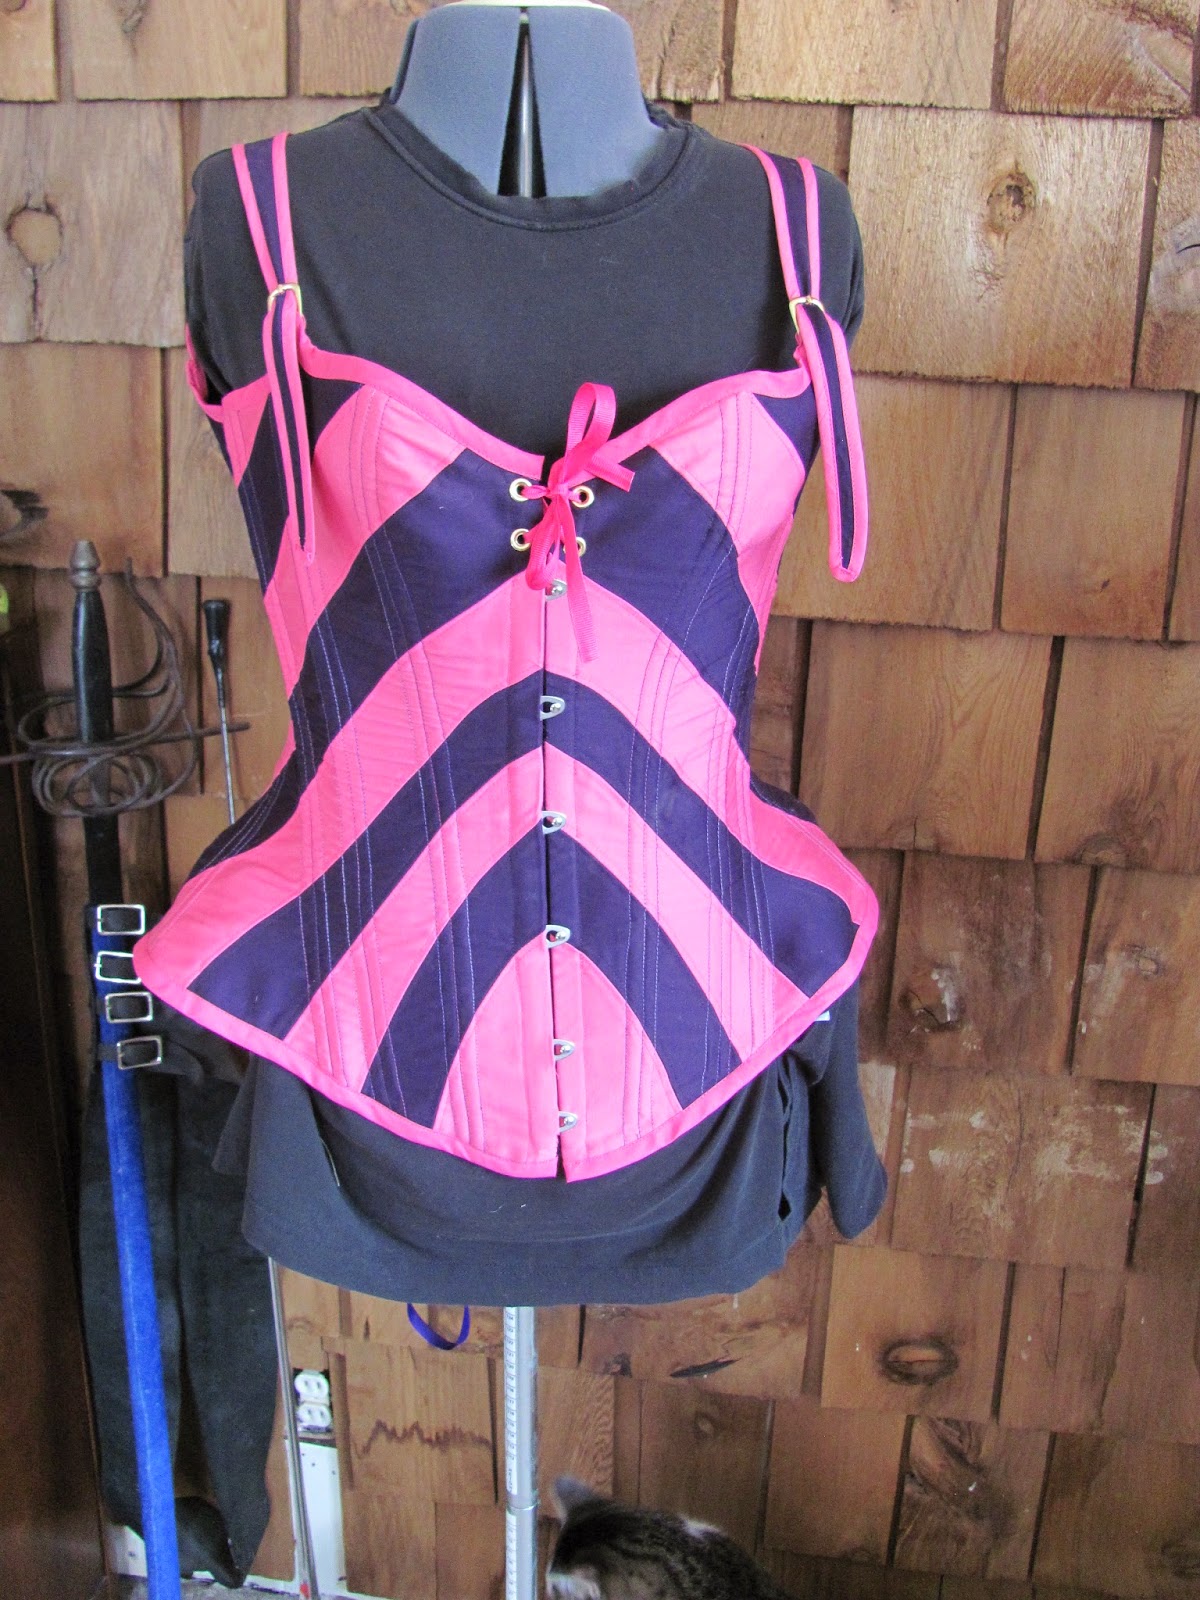
Here is the final corset, please forgive the odd lumpiness of displaying on the dress form!  My dress form has neither my hips nor my bust.  The extra ribbons on the back are to allow the tail to be attached. The only thing I wish to do now is floss the bone channels.  The use of a single layer makes me really nervous, even though many surviving corsets were only one layer.  I want the flossing to help reduce wear by the bones.

Speaking of tail attachment, I did redo the tail.  My husband boiled some leather and allowed it to dry overnight to make a strong base. He then took the wire supporting the tail and ran it through 2 holes in the first piece of leather.  After the wire was through, he made loops out of the wire flush with the leather.  This prevents the wire from sliding back out of the holes and gives a good strong base to hold up the tail.  The wire is then sandwiched by another thick piece of leather and the two pieces of leather are riveted together.  The image to the left shows the two thick pieces of leather which sandwich the tail wires.

I then added a decorative layer of pink leather which is attached by rivets and some grommets to lace the tail to the corset.


The tail can then be attached to the corset using the short purple ribbons.  This means that the tail is easily removable and easy to put back on for important things like car rides and bathroom breaks. 
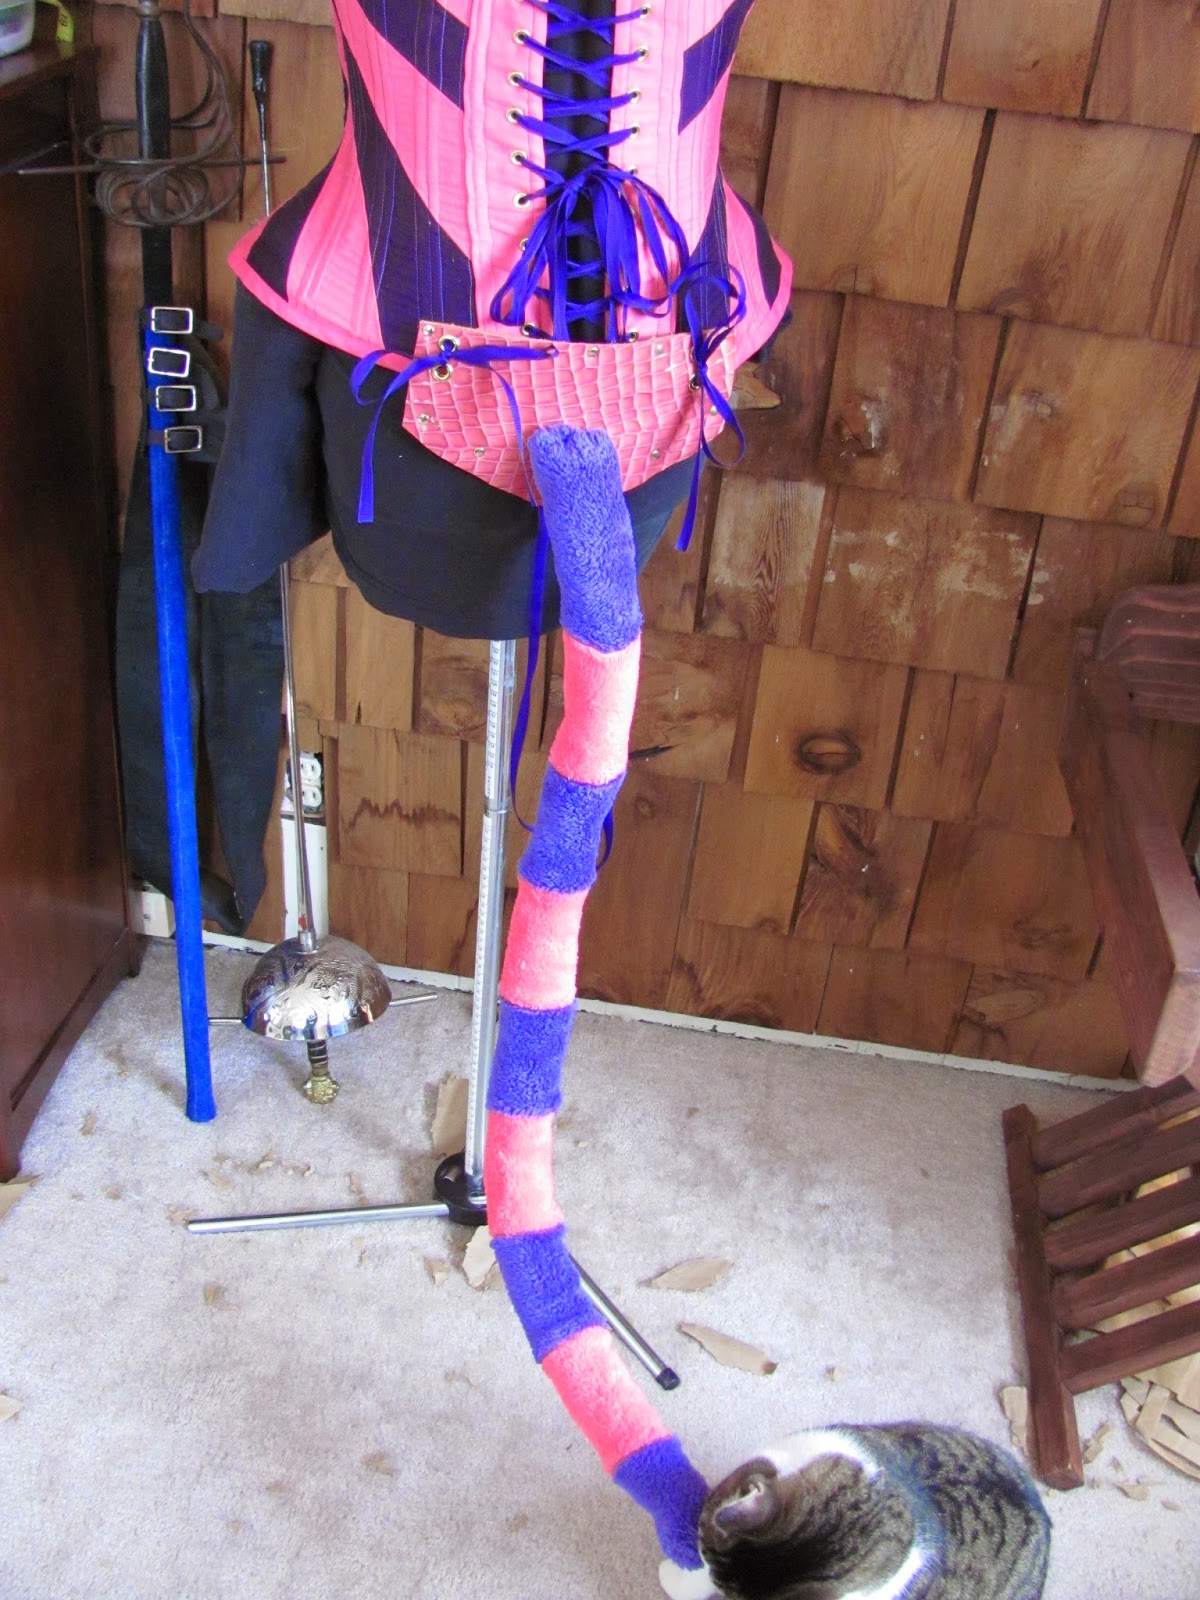


The tail is actually quite long as you can see in the second picture.  So long that I often smack people with it on accident.
Don't mind the actual cat, he is trying to pull the fuzzy tail cover off the tail.  He actually did manage to stretch the fabric in the short time it took me to take pictures. He is very young and has not yet learned his costume manners!

This next weekend, I will write up the actual event and include pictures of the full outfit.  I am so glad I felt better in time to actually finish this outfit, it was so fun to play dress up with the full group and we ended up with 11 people doing Alice in Wonderland with us!