Thursday, August 28, 2014

Teacup Hat take 2

Remember my last attempt at the Teacup hat?  Lots of fun but way too big for most things.  I decided to make a smaller one as a fascinator rather than a full huge hat.  I used the same pattern as my last teacup hat but I am going to include a bit more how to in this post.  First I traced all of the pattern pieces onto heavy duty one side fusible interfacing.  I made 2 copies of everything but the handle piece in the fusible interfacing.  I cut out the interfacing and fused it to the fashion fabric and lining fabric.  Then I cut the fabric.
Next i stitched the straight edge of the saucer pieces and the darts and side seams on the cup pieces.  I then stitched the lining to the fashion fabric right sides together, clipped the seams and turned the pieces right side out.  I did this for the saucer along the inner edge, the saucer bottom (the larger circle) and the cup bottom (the smaller circle).  I whip stitched the opening shut on the saucer bottom and cup bottom.  I did not machine sew the cup fashion fabric and lining together as it would be too difficult.  So I hand turned the bottom and whip stitched to fashion and lining together. 
I then stitched the saucer bottom and the cup bottom to the cup and saucer pieces by hand.  The outer edge of the saucer and the upper edge of the cup were cut with no seam allowance, since I decided to edge the cup and saucer with bias tape.  Over the bias tape I added silver trim and also trimmed the handle piece.
For decoration, I added a keyhole piece and key intended for scrapbooking, a ton of hot fix crystals and a small spoon that I got from the jewelry department of a local craft store.  Here is a picture of the finished teacup fascinator and the monster teacup hat I made previously for size.


Tuesday, August 12, 2014

Giant Teacup Hat

This hat was not supposed to be giant.....but I thought the original pattern would be too small and I apparently enlarged the pattern a bit too much.  I may remake it smaller at some point. 

I love teacup hats and wanted to make one of my own.  I figured it would make a perfect small project and would give me a cute hat for steampunk tea parties.  The pattern I used was a free instructable Quilted Mad Tea Party Set for a quilted tea set.  I figured the teacup would work well as a hat and someday I may even make a teapot hat!  I did make the teacup bigger and probably too big, see the picture below as the hat is as tall as my head!  The only other change was I stiffened both the lining and the fashion fabric with fusible interfacing to help it hold up to being worn rather than just sitting on a table.  The hat is kept on my head by 3 hair clips and seems to stay pretty well, even though my hair is fairly slick.


Victorian Picnic

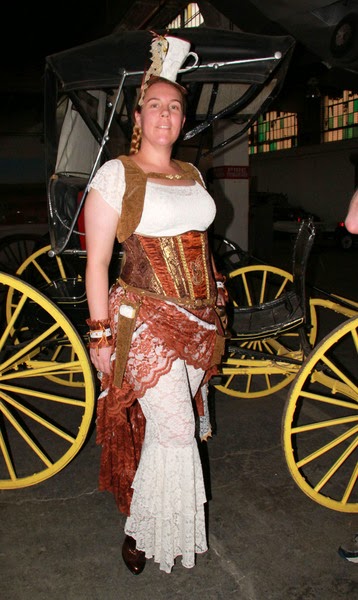
The Steampunk Vampire dress is made such that the steampunk bits are all added as accessories.  I did this so I would also be able to wear the dress as a regular Victorian dress.  I had the opportunity to wear the remade dress to a Victorian Tea hosted by a local tearoom.....I just needed to get the remade dress to a wearable state!  Thankfully, I had made this dress before so it went together pretty quickly.  For the most part I remade the dress exactly as it was before.  There were 2 big exceptions, one planned and one not so planned. 

The planned one was to make a Balayeuse.  Basically this is a removable dust ruffle for a skirt.  I got the idea from an article on Your Wardrobe Unlockd, which is a fun costume e-zine which I am a member of (Making a Balayeuse).  If you are not a member the e-zine allows the authors to put their articles on their own site after some period of time and the same article is available on the author's blog (Yesterdays Thimble).  I thought a dust ruffle would be a great idea for this skirt since half the stripes are white and that means they show dirt!  Anyway, I did not follow the article since this skirt is an odd shape, I used the skirt pattern as a guide and made a Balayeuse out of cotton muslin.  In the pictures, I have it just pinned to the inside while I figure out the correct height, you can see it poking out the skirts in some of the pictures.  I want it to be a bit longer to protect the skirt but not show too much since it is very plain.  Once I get it properly adjusted, then I will make button holes on the Balayeuse and button the Balayeuse to the skirt. 

The non-planned change was the addition of a pleated ruffle around the bottom of the skirt.  I finished cutting everything out and realized I had fabric left over.  I had a really hard time estimating fabric since the pattern calls for 45 or 60 inch wide and the original was 45 wide, but the new fabric was 110 inches wide.  I used all the remaining fabric to make a box pleated ruffle for the bottom of the skirt.  Ok, so enough talk time for some pictures! 

Some notes: I did not manage to finish my new hat, so the hat I am wearing will be replaced in the future!  The beautiful fan I am carrying was made by The Treasures Of Dawn and the stockings and shoes were from American Duchess.  I love how comfortable the Victorian Button Boots are!  The other very lovely dress was made by a good friend of mine, I love how her red and green dress came out and I especially love her hat!